Nederlands
Sound System 300 People


-
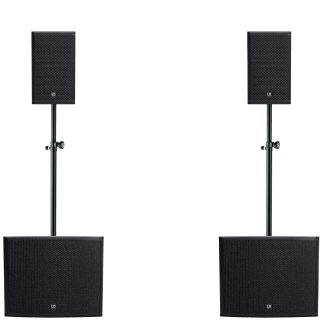
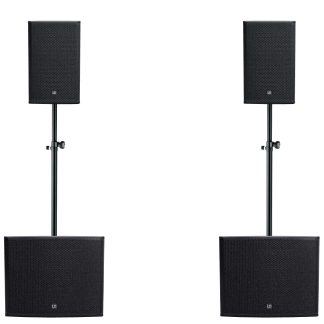
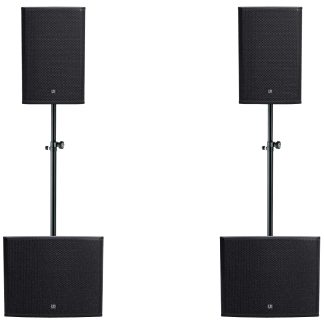
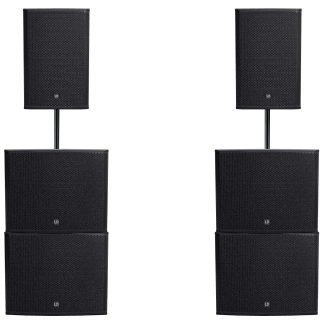
 Sound system with two 15" top speakers and four powerful 18" subwoofers
-
Built-in amplifiers, cables included
-
Powerful sound system with deep bass reproduction
-
Available at Amsterdam and Breda locations
Pros and cons
- Fantastic bass reproduction
- A large sound system that is plug & play ready to use
- Built-in amplifiers, so can be connected directly to a DJ set or mixer
- Needs to be transported in at least a van
Description
Rent speakers for your event? This powerful sound system has four subwoofers and two top speakers. The amplifiers are built-in. Easy to connect to a DJ set or audio mixer.
Planning a big party or an event where you expect around 300 people? Then this powerful sound system is the perfect choice. The sound set comes with cables and connecting poles. The amplifiers are built into the speakers. The set is plug & play. You can easily connect it to a DJ set or other mixer.
What to rent this sound system for?
When you simply need it louder and bass reproduction is important, this sound system is the solution. For 300 people (and even more depending on the space), this set is extremely suitable. Using the cables provided, you can easily connect these speakers to a DJ mixer or other audio mixing console.
What does the speaker set consist of?
The sound set consists of four LD Systems Stinger 18A G3 subwoofers and two LD Systems 15A G3 top speakers. As well as six multi-cables and two connecting poles.
What can I connect this sound system to?
All speakers in this sound set are active. This means that the amplifiers are built-in. This makes the transport volume smaller and the connection easier.
What are the rental options for this sound set?
We have two rental locations in the Netherlands where you can go in case of self-pickup / return of a rental order with this sound system for up to 300 people. Renting sound equipment in Amsterdam and renting sound equipment in Breda is easy because our locations are here. But we also offer the option of delivery on location and even set-up & breakdown. Add these options when placing your rental order. This makes renting sound equipment throughout the Netherlands much easier. So renting sound equipment in Utrecht, renting sound equipment in Rotterdam and renting sound equipment in The Hague? No problem. Make use of our transport and installation service for this sound system for up to 300 people.
How do I set up this sound system and how do I connect it?
Place the LD Systems Stinger 18A G3 subwoofers on the flat side so that the logo is readable from the front. Then place the next LD Systems Stinger 18A G3 subwoofer on top, so you get two stacks of two subwoofers. Screw the connecting poles with the threaded bolt into the mounting point on top of the upper subwoofers. Adjust the height of the connecting poles with the knob on the side of the connecting pole.
We recommend adjusting the top speakers to ear level. Place the LD Systems Stinger 15A G3 speakers on the connecting poles and tighten the anti-rotation mechanism. Unroll the two provided multi-cables with the red cable tie. The end with the power plugs goes towards the DJ set or mixer. The end with the black plug (Powercon True1) goes towards the subwoofers (left and right). The black plug (Powercon True1) can only fit into the bottom subwoofer in one place. When the plug is in the speaker, gently turn it to the right until you hear a click.
Do this for both the bottom subwoofer on the left and the bottom subwoofer on the right. The other connector in the multi-cable (XLR male) goes into the left position where it says ‘input’ on the subwoofers. Do this also for the bottom subwoofer left and right. On the other side of the multi-cable, you will find the power plug. Connect this to the power grid. At this same end, you also have the (XLR female) plugs. These go into the sound source (DJ set or sound mixer). Then unroll two multi-cables with the blue or yellow label. Use this cable to go to the subwoofers.
The large Powercon True1 loop-through plug goes into the output of the bottom subwoofers (don’t forget to turn it to the right). The XLR female on this side of the cable also goes into the bottom subwoofer in the place where it says ‘thru’. The other end of the loop-through cables goes towards the subwoofers placed on top of these. Connect these the same way as in steps 5 and 6. Then take the next two multi-cables with the blue or yellow label. Now repeat steps 10 and 11 for the connection between the top subwoofers and the top speakers.
Turn on all equipment, including the DJ set or sound mixer, the speakers, and the subwoofers. Set the desired volume on the back of the speakers and subwoofers and you’re ready to start.
Product specifications
| Production specific information | 4200 Watt RMS |
|---|---|
| Transport specific information | The speakers and subwoofers are each delivered separately with covers. The stands come in a 1m long bag. The cables are in a crate. Crate dimensions: 600 x 400 x 135 mm (L x W x H). |
| Input(s) | XLR/Jack Combi and Powercon True1 |
| Output(s) | XLR |
| Watt | 8400.00 |
| Amperage | 36.52 |
| Included accessories | The speakers are supplied with stands and multi-cables (power + signal) |
Delivery costs
Delivery to location is available for orders from €100,- Excl. VAT. Enter the location for an indication of the delivery costs.
Good to know
Ease of use


Transport


Connection instructions
 Download Connection Instructions
Manual
Download Manual