Nederlands
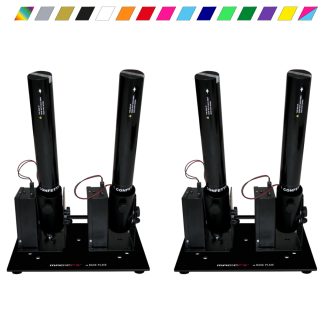
Confetti Set 1


-
 Compact set with two cannons
-
Dazzling effect for your event
-
All necessary materials in one set
Pros and cons
- Convenient complete confetti set for a spectacular show
- The set is suitable for smaller events with up to approximately 50 people
- Choice of different colors and shapes
- The shooting elements cannot be used continuously on power
Description
Want to rent confetti? Are you organizing a building opening, unveiling a specific object or painting, or want to spectacularly open your event? With this Confetti Set 1, you give it extra power. This set is well-suited for smaller events. Additionally, this set ensures a dazzling and colorful start to your event or unveiling, creating an unforgettable moment.
What confetti shapes are possible?
Confetti Set 1 can be configured in various ways. When renting confetti, you have a choice in the shape of the confetti to be shot. You can choose from the usual snippets as you often see at various events. The snippets flutter slowly downwards and provide a long-lasting colorful effect. The confetti is shot up to a maximum of 12 meters far/high by the shooters.
Additionally, when renting confetti, you have the choice of serpentine confetti. This is usually called streamers. That’s because these are long strips that are shot into the air. This gives a grand effect, but due to the longer shape, it will be on the ground faster. The streamers are shot up to 20 meters far. On this page, you can easily indicate your desired shape.
What colors are available when renting confetti?
The confetti set is delivered with multicolor confetti as standard. This includes all colors mixed in the tube from which the confetti is shot. Do you want to rent confetti but need a specific color for your event? In the color selection on this page, you have a choice of many different colors. Renting confetti but want a specific mix of colors? You can also choose this and indicate in the comments which color combination is desired.
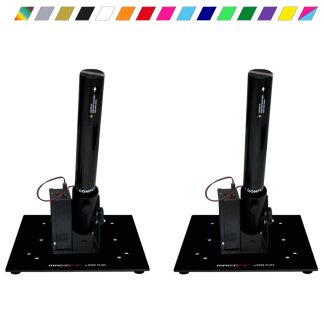
Renting confetti? What does this confetti set consist of?
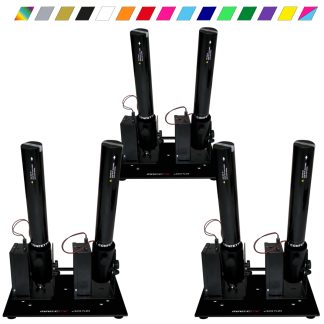
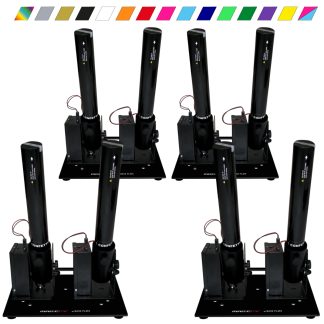
Are you going to rent confetti but first want to know what this Confetti Set 1 consists of? This set consists of two Magic FX shooting devices with a baseplate to secure the devices. Each cannon has its own confetti tube. So that’s two confetti tubes in your desired color or shape. This is enough for one shooting moment. Do you want to shoot confetti or streamers into the air more than once? Then choose more shooting moments in the product configuration. Additionally, the set comes with a control box with a key. You connect the shooting equipment to this box. This box also ensures that the confetti doesn’t go off unintentionally. Of course, everything is supplied with the necessary cabling.
How do I use Confetti Set 1?
Renting confetti but not sure how to use a confetti set? It’s simple. The confetti can be shot with the supplied control box. This is equipped with a key to ensure that the confetti doesn’t go off at an unwanted moment. This way, you maintain control over the shooting moment. On this box, there’s a ‘Fire’ button. When the key is set to ‘On’, the ‘Fire’ button will light up red. When this button is pressed, the confetti will be shot.
Next to this button, you will also find a switch. However, you won’t need this when directly connecting to the shooting devices. Want to let others determine the shooting moment? Then you can also use our white launch pole with red button. Want to know how to easily connect the set? We’ll explain that for you below.
How do I connect the confetti set?
Renting confetti but wondering how to connect such a system? Earlier, you read that when renting confetti, the set comes with the necessary power cables. However, the shooting devices are not suitable for connecting directly to a power outlet. The use of the control box or the launch button is always necessary. These interrupt the continuous power supply to the shooting devices. This prevents the shooting equipment from burning out. Unfortunately, these cannot be controlled wirelessly.
How do I connect the set with the control box?
1. Connect the Effectivator 1 to the mains with the supplied power cable (PowerCON TRUE1). The black PowerCON TRUE1 connector can only be connected in one place on this controller. When the plug is in the device, gently turn it to the right until you hear a click.
2. On the back of the controller, you will also find a Schuko outlet. This is located behind a black flap. You connect the shooters to this. You do this by first connecting the supplied power strip to the output of this controller. Then use the supplied extension cables to increase the distance between the power strip and the shooters. It doesn’t matter which outlets of the power strip you connect the extension cables to. Unroll the extension cables to the place where you want to position the shooters. Connect one shooter to the end of each extension cable.
3. It’s now time to install the shooters. First, you need to attach each shooter to a floor plate. This prevents the shooter from falling over during firing. You can easily and quickly attach the shooter to the floor plate using the bolt and nut.
4. Now connect the shooters to the ends of the extension cables using the supplied power cables (PowerCON TRUE1). The black PowerCON TRUE1 connector can only be connected to one place on this shooter. When the plug is in the device, gently turn it to the right until you hear a click.
5. Time to test! Always do this without the tubes being placed. Turn on the controller. The LED on top of the controller will light up green. It’s now time to insert the key into the controller and turn it. Once you’ve done this, the LED turns red. Note: the controller is now active! Since you have NOT connected the tubes, you can now safely press the ‘fire’ button. When you press this button, white LEDs should light up on the shooters. The white LEDs only light up when you press the button. When released, the white LED immediately turns off again. Is everything working? Then turn the key back.
6. It’s now time to place the tubes with confetti in the shooters. Push the tube into the shooters. It will automatically be secured by the internal clamps. Then it’s time to plug the small connector attached to the tube into the connection on the shooter. Due to its asymmetrical shape, this can only be done in one way. Once you’ve done that, the system is ready for use!
7. To use the system, insert the key into the controller and turn it so that the system becomes active. Then it’s a matter of waiting for the right moment and firing the confetti with a press of the ‘fire’ button.
How do I connect the set with the launch button?
1. Connect the launch pole to the mains using the supplied power cable (PowerCON TRUE1). The black PowerCON TRUE1 connector can only be connected to one place on this pole. When the plug is in the device, gently turn it to the right until you hear a click.
2. Next to the connection for connecting the launch pole to the mains, you’ll find the outgoing power connection. Connect the other supplied power cable with 2-way power strip to this. The black PowerCON TRUE1 loop-through connector can also only be connected to one place on this pole. When the plug is in the device, gently turn it to the right until you hear a click.
3. Then use the supplied extension cables to increase the distance between the small power strip and the shooters. It doesn’t matter which outputs of the power strip you connect the extension cables to. Unroll the extension cables to the place where you want to position the shooters. Connect one shooter to the end of each extension cable.
4. It’s now time to install the shooters. First, you need to attach each shooter to a floor plate. This prevents the shooter from falling over during firing. You can easily and quickly attach the shooter to the floor plate using the bolt and nut.
5. Now connect the shooters to the ends of the extension cables using the supplied power cables (PowerCON TRUE1). The black PowerCON TRUE1 connector can only be connected to one place on this shooter. When the plug is in the device, gently turn it to the right until you hear a click.
6. The entire system is now connected. Time to test! Always do this without the tubes being placed. This prevents the confetti from being unintentionally fired. Do this by pressing the red button on top of the launch pole. When you press this button, a white LED should light up on the shooters. Check this with multiple people. The white LED only lights up when you press this button. When you release it, the white LED immediately turns off again. Is everything working? Then you can start placing the tubes with confetti.
7. You do this by pushing the tubes into the shooters. They will automatically lock in place due to the internal clamps. Then it’s time to plug the small connector attached to the tube into the socket on the shooter. Due to its asymmetrical shape, this can only be done one way. Once you’ve done that, the system is ready for use!
8. Then, wait for the right moment and shoot the confetti by pressing the red button.
Is this set environmentally friendly?
Renting confetti but worried about its breakdown? You don’t need to worry about the confetti being harmful to the environment. The confetti used in the cannons is biodegradable and therefore does not damage the environment. So you can rent the confetti set and use it outdoors without concern. However, this does not apply to metallic confetti such as gold and silver. These colors are only for indoor use.
Product specifications
| Production specific information | Shoots confetti up to 12 meters far |
|---|---|
| Transport specific information | The set is packed in a crate. Crate dimensions: 600 x 400 x 135 mm (L x W x H). |
| Input(s) | TRUE1 |
| Output(s) | True1 |
| Watt | 245.00 |
| Amperage | 1.07 |
| Included accessories | The set comes with all cables and base plates. |
Delivery costs
Delivery to location is available for orders from €100,- Excl. VAT. Enter the location for an indication of the delivery costs.
Good to know
Ease of use


Transport


Manual
 Download Manual